Ignoring the pretentiousness in the mere name itself - “Sous Vide”, which sounds even more annoying if you say it with a French Accent, it is essentially cooking stuff in a plastic bag immersed in water. The exact translation is “under vacuum”, but seeing as though I am entirely to low brow to own a vacuum sealer I will be presenting this most excellent method of cooking meat using a much simpler method.
So what is it and why is it awesome? Ignoring once again the vacuum part, which I am under the impression would contribute very little to this particular recipe anyway, what we will essentially be doing is cooking the steaks in a ziploc bag in a water bath at a precise temperature. The advantages are twofold towards achieving a steak of epic proportions;
1. There is zero chance of overcooking
2. The steak will be cooked at your target temperature the entire way through.
If you are a lover of meat cooked rare to medium-rare this will be of particular interest as even with the highest of cooking temperatures using ether a grill or skillet, even cooking is simply not possible.
So, given the simple nature of what we are about to do there are a few details to sort out. First is finding a way of maintaining a pretty low temperature of 125F for 2 hours. If you have an oven that is accurate at this low a temperature, wonderful. If not you will need to get creative.
Software:
Hardware:
- 8 qt. Saucepan
- Cast Iron Skillet
- Oven Thermometer accurate at a low temperature.
- A pizza stone or cast iron skillet (placed in the oven to provide thermal mass)
Step 1) Start by leaving the steaks out to come to room temperature. Go ahead and season them at this point and the rules are similar to grilling with the exception of olive oil. Don't use it, as olive oil will develop an odd taste if cooked at a low temperature for an extended period of time.
Step 2) Preheat your oven to your target temperature, in this case 125F. Thermal mass is your friend so including something heavy is a great idea. A pizza stone or a cast iron skillet would work just fine.
Fill a large pot with hot water. More is better so fill it as much as you can and still leave room for the water to displace once the steaks are added. My tap water is 120F so heating this on the stove those last 4 degrees will quicken the process up considerably.

For no particular reason, a picture of meat.
Step 4) So now that you have them seasoned grab your double zip loc freezer storage bags and put a steak into each one. Now it's time to get implement our ghetto vacuum technique by zipping the freezer bag all the way across and then unzipping a portion in the middle and then start to slowly lower the bag into the water. The idea is to let the water push all of the air out of the bag, like so:
When you get to the zipped part just zip that little bit that was unzipped and there you have it.
Do this for the rest of the steaks and cram them all into the pot. Since there is no air in the bags you shouldn't have a problem with them floating to the surface. If you do just put a ceramic mug on top of them to keep them submerged.
Step 5) The water temperature will have dropped after the steaks are in the pot so leave them on the stove on a low heat to return the water to your target temperature. Mine dropped 15F once the steaks were dropped in. Once the water is back up to your target temperature throw the whole thing in the oven.
Step 6) Now it's time to go drink beer and occasionally check on things to make sure the oven is doing its job and the temperature doesn't creep up on you. It should be very easy to moderate if it does since the large thermal mass will work in your favor. If the temperature gets more than 2F over your target simply turn off the oven and crack the door. When it gets back down turn it back on again. Easy.
Step 7) After 2 hours get your cast iron pan nice and hot and prepare for some quick searing to give us the beloved complex blend of flavors that only the Maillard Reaction can give us.
Straight out of the bag they will look pretty unappetizing. Thoroughly cooked, but needs some work.
Remember, the cooking is done so we want to limit the time in the pan, no more than 1 minute per side and it is not necessary to do this at a nuclear high heat. Technically the Maillard Reaction happens somewhere around 310F, which on most stoves should be somewhere around a medium heat setting on a well pre-heated pan.
After 1 minute per side things start looking right:
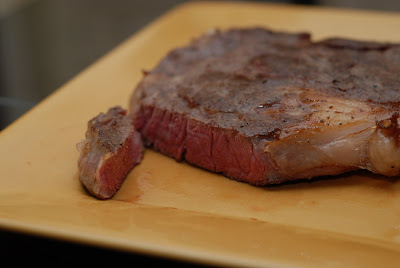
And this is what it's all about, a perfectly cooked steak from top to bottom with no gradient at all.
Meat lovers rejoice.


